Friday, December 7, 2012

Holiday Soap!


Let's face it one of the best things about the Christmas season is all of the yummy goodies that bring to parties, work and the neighbors!  Once in a while it's super fun to receive a 0 calorie treat right!  It's a little more guilt free:). 

What we are doing this year for our neighbor gifts is giving away fun Christmas soaps!  I had a lot of fun designing these different styles so that there is a variety and really the possibilities are endless!


The shape of the Soft Soap bottles is great for a variety.  Bath & Body Works bottle we be awesome for a tall skinny tree!


Peel the front sticker off and then take the residue off with Goo Gone.  Apply your vinyl lettering and then voila!  You have a great gift!


Add jingle bells and a tag that says we WASH you a Merry Christmas for a super cute look!


Wednesday, November 14, 2012

Believe


I absolutely love using cupboard doors to decorate with!  This Believe vinyl with the handle is one of my favorite Christmas decorations!  I love the cream with the cranberry.  The cupboard door give this sign a sophisticated style and the handle with ribbons is a perfect finishing touch!

Tuesday, November 13, 2012

The Real To Do List


I love this sign.  We should all take time out of each day to do some of the things that really matter!

Using multiple colors with vinyl adds a fun flair to any sign!

Thursday, November 8, 2012

Rustic Joy Christmas Sign


I love love love making Christmas decorations!  This sign was inspired by an old piece of wood that my husband had acquired.  I asked him to get rid of it and most of it disappeared but a long strip was left.  After looking at it for months I realized it would be the perfect rustic sign!  So got started.


I choose the roughest side for the front and painted it red.  Needless to say at this point my hubby was a little worried about how my idea was going to turn out!   The next thing I did was apply a vinyl JOY.  Note the fabulous blue color:).  I used a color I had a lot of since I wasn't leaving it on.  The next thing I did was apply a lot of car wax to the sides.  I did this because I was some of the red to come through.


Then I got started on the top coat.  I sprayed 6-8 coats of white on top.  (Of course letting the paint dry in between each coat.)  After the paint dried I removed the vinyl and used a rag to rub off the wax and behold the beautiful red that came through!  The wax part is kind of messy so be prepared for that.  


Once all of that was completed I rubbed in a coat of stain to the top.


For the finishing touches I drilled hole 1.5" in from the sides and added wire, a ribbon and rustic jingle bells!


Friday, October 5, 2012

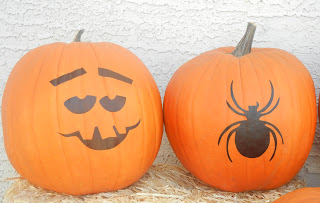
Vinyl Lettering For No Carve Pumpkins

 Adding vinyl lettering to pumpkins is a great way to decorate them without any of the mess of carving!
 The possibilities are endless.  Jack-o-lantern faces, bats, spiders, they are all so much fun!
 If you love carving pumpkins for Halloween you can use the vinyl as stencils to carve your designs!


Tuesday, August 7, 2012

Back to School Labeling


It wouldn't feel like back to school if we didn't label things with vinyl or find a way to put a ribbon on at least some of our supplies!


This year for our notebooks my daughter decided to go with the less is more look.  a little ribbon and a little vinyl goes a long way toward being cute.   One of my daughter's used tombo to put the ribbon on down the side of her notebooks and then we just put one small vinyl in the corner to personalize each notebook. 


For the inside of one of my daughter's binder she wanted to label one side for homework and the other side for papers ready to turn in.  I was super willing to accommodate that request!  We coordinated the colors of the vinyl with her folders, just to keep it fun for her. 

I hope that everyone has a great school year!  I sure appreciate all that our teachers do for us!  They are awesome!


Tuesday, July 3, 2012

Brighten Up Your Subway Art


I absolutely love the subway art phase!  It is such a simple, clean and cute look!  It is a great accent with anything because it's never too busy.  I love love love the black with the cream lettering.  It is one of my all time favorites.  With all of the fun summer colors for summer in clothing and accessories I'm thinking why not brighten up my subway art for summer as well?

I used a 17" x 20" piece of MDF.  I painted it using Americana's Sea Breeze acrylic paint.  I usually like to stain over my signs to add an antiqued look to it.  When I made this sign though I had had a headache for four days though... so I wasn't up to smelling stain.  Instead I took some brown paint and watered it WAY down.  After I painted it over the top I took a paper towel and wiped off the excess paint and it was the perfect look! 

Originally I was going to put black lettering on, but I decided to go even bolder and try out the dark red letters over this green.  I love it!  It's fun to experiment and try new things.

Wednesday, June 20, 2012

4th of July Centerpieces


These bottles are so fun for patriotic centerpieces!  I think they are great for 4th of
 July or Memorial Day. 


They are Bud Light Platinum bottles, and what is so great about them is they don't have any raised lettering on the actual bottle!


The possibilities are endless for these really, I went with a firecracker and star theme.


You could add ribbon, or put flowers in them, or put lighting in them!  I just added some of the fun wired stars from the dollar star in them.  If you're looking for a quick fun centerpiece this is perfect!


Tuesday, June 12, 2012

Divine Dads


This is one of my all time favorite sayings.  I think being a dad has got to be one of the hardest and most rewarding jobs there is.  Provider, protector, teacher, and on and on.  This saying is on a 12x12 piece of wood that has been routed and sanded on the edges.  This would be a great saying for a tile and we've even made it in a different layout that is 4"x36".  Happy Father's Day to all of those great dad's out there.

Friday, June 1, 2012

Chore Charts


These chore charts are one of my favorite things about this summer so far!  I love the slow down of not having to rush to be ready for school every morning, but let's face it will still need to get some work done around the house.  These are perfect for us!  Everyone one knows what's expected of them for the day and I can easily see how to organize what I need help with.


I decided on using frames so that I have the ability to write on the glass with dry erase markers.  I love rotating the chores and I didn't want to have to store cards or magnets that we weren't using on a particular day.  I decided on tall skinny ones because they fit perfect in my space.


Next I cut and pieced together 2 12x12 pieces of paper with tombo.


I antiqued the edges of the paper with black ink.


I used vinyl on the paper for the names so that they would be protected behind the glass from kids writing over them, etc.  I added one little embellishment by each name.


I debated about putting the everyday chores underneath the glass or on top of the glass.  I decided to put it on top of the glass just in case I wanted to change things up... like say someone quits the violin... I don't want to have to re-do the whole chore chart.  I'll just peel of practice violin and still be good to go.


My favorite part about this chore chart is writing the other chores that we rotate in dry erase marker.  So far the kids are loving this new arrangement.  (We'll see how long that lasts though:).  They check off their chores when they're done and my little guy even writes new ones on that I ask him to do (like put in a trash bag) if it's not written on there.


Monday, April 30, 2012

Balloon Sandals

My daughters saw these fun sandals online and wanted to make them. They were cheap, fun and easy to make!
We pick up your basic flip flops at Old Navy. They were two for $5.00 and had a ton of fun colors to choose from.
We picked up water balloons from Target and ended up using just under two packages of 50 count each for each set of sandals. The dollar store would be a great place to pick these up as well.
The key to making these is stretching the balloons out before you tie them on the sandals. Also you want to make sure that you alternate the way that you tie the balloons on.
We watched a movie while we made these and it did take us about the whole movie to make them so I wouldn't recommend this craft for a birthday party, but it was fun for a girls afternoon with each other.

Monday, April 23, 2012

Welcome Wreathe

I love how this Welcome wreathe and board turned out! It was definitely one of those projects that kept evolving. I originally intended on it being a Spring wreathe. Unfortunately Spring is so short in AZ and so I decided to make it into a Welcome sign and switch out the wreathes throughout the year. For the wreathe I cut out small circles out of felt. I folded them in quarters and then pinned each one on the wreathe.
I also stained the wood and the bead board and let the wood dry for 24 hours.
I put wood glue on the back of the bead board and put clamps on each of the corners and let it dry for 24 hours.
I put wire on the back of the board and tied the ribbon on the back of the wire.