Sunday, February 13, 2011

So Many Ways To Say Be My Valentine


I love making Valentines. There are so many good ideas. Here is one of my favorites... chocolate covered strawberries. This arrangement is something that I made a couple of years ago for my husband's birthday. First I started dipping strawberries in chocolate (I like using almond bark). I covered some with sliced almonds and others with coconut. I had a red container that I put a piece of floral foam in the bottom. I covered it with kale. After the strawberries were set up I put then on a kabob skewer with a piece of kale right under the strawberry and then stuck it in the foam. I will say if you're going to deliver this you will need someone to hold it while you drive. I also love putting a variety of dipped strawberries on a plate for something a little simpler, yet just as yummy!

This year since my husband will be on a business trip I had to go with something that isn't quite so perishable. Chocolate covered pretzels! I dipped the pretzels and then drizzled a little pink chocolate across the top in the spirit of Valentine's day!

One last idea for this year was inspired by one of my friends. She told me she was going to take a deck of cards and cover them with cute scrapbook paper and then write things she loves about her husband. It's a brilliant idea, and perfect for sneaking into someone's luggage! (Which is what I was looking for). I started thinking though... if I cover all the cards in paper it's not going to fit back into the box, which would be fine at home, but I needed these babies to fit back in the box and be nice and compact. We found these Valentine cards at Michael's for $1! Amazing deal... saying I love you doesn't have to be expensive, just thoughtful!

So here's what I did... I sanded the face cards so that I could write across the top! It worked like a charm.


Light sand paper is perfect for this and I found that paper worked even easier than the block. I used a red and black Sharpie to write the love notes and then I inked the edges just to finish it off.


I stacked them back in the case and the top seemed a tad plain so I added the stickers to the top for a little added flair.


Happy Valentine's Day!

Kristin

Tuesday, February 8, 2011

Happy Birthday Sign


Want a great way to say Happy Birthday? This yard sign is just the thing then. This sign is made for a group of girls so that explains the pink... this could be done in any color.

So to get started I used a 15"x10" piece of routed MDF. I painted it chocolate brown.


After the paint dried I applied the vinyl. This is currently my favorite Happy Birthday layout.


Okay now the easy part is done. Want to use it inside? Just put a back or a handle on it and you're good to go. For a cute yard sign though, this is what you need. You need a stake, wood screws (I used 1") and I also used liquid nail. (I bought all of these at Lowe's). While I was there buying the screws one of the workers told me about liquid nail... it is sold in a little tube in the paint section. He said it would just make it extra secure.


Okay so make sure your stake is sanded really well so that you don't get any splinters. I tried to skip this next step and I ended up having to go back and re-do, so do not skip this step! The next thing you need to do is find a drill bit slightly smaller than the screw you're going to use. Measure and mark where you want to attach the stake to your sign and where you want the screws to go. After you have this marked drill all the way through the stake and drill partially into the back of the sign. (This will allow you drill the screw in without cracking the wood or having the screw go in crooked.) Okay so now that the holes are in it's time to squirt the liquid nail on the sign and line up the holes so you can put the screws in. I'm more creative than scientific... I used toothpicks to line up the holes, (I'm sure my husband is getting a chuckle out of this if he's reading it.) But it worked. I took out the toothpick and drilled my first screw in, then moved on to screw number 2 and I was done! I wiped off any excess glue and left it to dry.


You may have noticed in the picture that I put the sign down a little so you can see the stake on top. I did this on the advice from my husband and the worker at Lowe's who said it would last longer if there wasn't so much hammering behind the sign when it was put into the yard each time. If you were just using this for your family that would probably be fine, but this is going to see quite a bit of use so I followed their advice and put a little ribbon on top. If you know me you know I love to add ribbon to anything I can so that worked out great. I also sprayed a light coat of lacquer over the sign and melted the ends of the ribbon to avoid fraying.

Hope you have a fun time crafting.

Kristin

As always, if you don't want to do it yourself send me an email: customerservice@signaturecreationsllc.com

Wednesday, February 2, 2011

Valentine's Day


Valentine's Day is one of my favorite holidays. I'm sure it has something to do with yummy chocolate and a built-in date night! This year I made some cute red lips for a customer and put them up at my house as well. I love vinyl right on the wall. Another cute saying that I made for another customer was "The Love Shack". The lips would be a cute addition to KISS me blocks, or a plate as well.

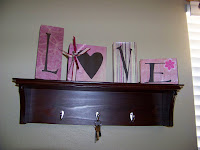
Here are a few ideas for some valentine blocks...


They have super cute mailboxes at the Target $1 section that I just added a little sticker and a ribbon to. Really fun and cheap to put cute notes in for your kids or your sweetie!


Okay and one more idea for today is adding vinyl to plates for a fun decoration.

Target, Wal-Mart, Pier-One and the Dollar Store are all great places to shop for plates. If you're interested in any of the plates pictured they are $5.00 each. If you don't live locally the shipping would be an additional $4.95. Contact me by email if you're interested.
kristin@signaturecreationsllc.com

Tuesday, February 1, 2011

Tiles


I think tiles are an amazing gift. They're adorable, affordable and can be done in various sizes. They're also perfect for that empty niche. Here is a peek of some I made last week...

I love to buy my tiles at the Home Depot. Applying the vinyl only takes a minute.